She thinks my tractor’s sexy
It really turns her on
She’s always starin’ at me
While I’m chuggin’ along… Kenny Chesney
When it comes shredding time for the pasture, The Fat Rancher always has this tune in mind. The tune chugs along just like TFR’s rusty old Kubota tractor.
I have tractor, therefore I am…
This year the the drought reasserted itself, with Williamson County showing “abnormally dry.” When planting hay, I try to time sowing within a week of two inches of rain. This year that opportunity didn’t present itself. So instead, I shredded the pasture and let the leftover haygrazer germinate. A surprising amount emerged.
The Fat Rancher’s task: Tame the grasses so that the hay has another shot.
This past weekend’s forecast for a couple inches of rain prompted me to shred again, so that the grasses and hay can grow back up from the rain.
Shredding is a love-hate affair. It’s a pain in the rear (literally, since there is no suspension on the tractor) and can be pretty hot in the summer sun.
However, time on the tractor is a marvelous time for reflection. The mind-numbing drone of the tractor coupled with concentration on the mow line, makes for a nice buzz in which to listen to some tunes.
More importantly, The Fat Rancher likes to be able to point to a tangible result from his efforts. And while a ranch with a cleanly shredded field may not solve world peace, it makes him feel peaceful about his little corner.
Occasionally, I’ll have some company. This week it was the clouds of crickets blasting off in all directions as I plowed through the fields of green. Some even hitch a ride on the tractor, skittering about trying to decide which way to leap.
Is it a Vole or a Tasty Treat?
In the past, I have counted voles as they scurry out of the way of The Fat Rancher.
Field vole (Microtus agrestis)
But I’m not the only one checking out the field-life. Mr. and Mrs. hawk can be seen circling the field or alighting in a tree to carefully watch for a tasty critter.
Red Shouldered Hawk
A job done. Now all we need is some rain.
In spite of multiple equipment breakdowns (it seems there is always something coming apart!), TFR got the back and front pastures shredded.
Well, the TwistIIClean filter was a great idea. However, the execution is a bit off.
The first issue we had was the red “Safety Latch” which is, in fact, not a safety latch at all. This red latch is essential to the operation of the filter backflush. You see, ordinary water pressure causes the backflush handle to torque, turning it toward the backflush position. So, without this latch in place, the filter won’t stay in the “filter” position. Within two months of installation, this latch broke. Apparently, this is somewhat common. The Fat Rancher was directed by the Lakos people to buy a pack of 5 latches from a third party. At a cost of $10 plus postage, thank you very much. Hmmm…
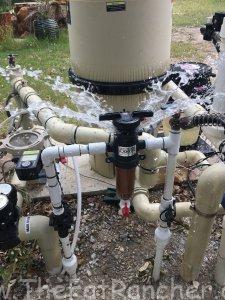
But more alarming was approaching the manifold and finding water cascading out of the TwistIIClean.
Thar’ she blows!
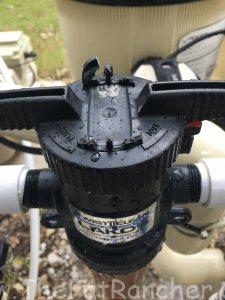
Upon further inspection, it appears as though the retaining clip brackets had broken through on both sides of the clip.
Further probing showed that the plastic had become brittle enough for the water hammer effect to break these retainers. Little doubt that this was a result of sun exposure on unstabilized plastic.
Note that the water pressure on my water well system is 50 lbs. max static.
Regardless, the result is a leak that cannot be stopped. The only solution was to shut the water off and replace the filter.
Conclusion
Lakos has not given me a sufficient explanation of why this happened to a filter that is just one year old. I must only conclude that the plastics they use won’t handle extended UV exposure.
At $100 per filter, I would not recommend this product due to its short lifespan.
The retaining clip bracket disintegrated due to issues with the plastic.
Trying it out: The Lakos Twist II Clean Sediment Filter
The Fat Rancher has constant challenges with his water well. Particularly when the drought conditions are severe. The Twist II Clean sediment filter may just help.
Lakos Twist II Clean Sediment Filter
Most of these issues have to do with an Iron Bacteria contamination in place when we bought the ranch. This is a good subject for a more extensive post. But the result is that we have periodic times when the pump will belch out rust-colored algae. While harmless from a health perspective, this detritus has the potential to clog whatever water processing is in line. Thus the need for sediment filters prior to any water conditioning or jetted appliances.
Sediment filters are readily available, the challenge is keeping them clean. Most require manual flushing, and often the screen needs to be manipulated to get the fine particles out. Not such a big deal, except that this always seems to be required at inconvenient times.
The Twist II Clean filter and sizing options.
So when The Fat Rancher saw the Twist II Clean sediment filter (Lakos T2C-075) at the local feed store, he had to try it out. I have a manual filter on my pool water/irrigation and this is an ideal area to give the Twist II Clean a try.
While this filter still requires a manual cleaning cycle, it is unique in that it is designed to reverse the flow of water through the filter while flushing the sediment bowl. This should reduce the number of times that the filter has to be disassembled to manually clean the screen.
Installation is typical for a sediment filter. This model is 3/4″ MPT (other sizes are available) and includes 2 FPT to Slip couplers and Teflon tape. It’s great that these are included in the package so that you don’t get to the job site and figure out you don’t have everything you need.
Double-check the orientation of the filter prior to installation. There is a very obvious arrow on the unit showing the direction of the water. If installed backward, the filter will not clean. All that’s necessary is to install the couplers and cement into the water line.
There is a 1/2′ MPT nipple on the bottom of the sediment bowl for the addition of a discharge hose. However, unlike manual sediment filters, there is no valve required here. In the operating position, this nipple is closed and no water flows.
Finally, note that there are two mounting eyelets on the filter body. These will require long lag bolts (to stand off from the mounting surface) along with some sort of shoulder/standoff to back up against. These are not included with the filter (though they probably should as the standoffs will be more difficult to scrounge up at a hardware store).
Using the Twist II Clean
Use is straightforward. The red “Safety Latch” is disengaged and the handle turned 90 degrees. This lifts the screen, opening the flush port, and reverses the direction of the water flow blowing the crud out of the screen.
Closing the Twist II Clean is a little more work. The pressure of the water and internal spring makes closing this valve a two-handed operation. In fact, Lasko has molded two mounting eyelets into the body so the filter can be fastened down. Since my application has the filter suspended by the supply tubes, I need to be careful not to break the “tree” when I’m closing the valve off.
Also, note that the valve may not stay in the run position unless that safety latch is engaged. This makes me wonder if this will be a failure point at some time, as it is a vertical clip with lateral pressure on it.
The Verdict
So far, the Twist Clean II does what it claims. The only open question is how often manual manipulation of the filter will be necessary if the backflush doesn’t clean the whole filter area off. But so far it is nice not to have to open the sediment bowl and clean the screen.
There have also been complaints on Amazon from some users about leak issues around the control handle.
I’ll be keeping my eye out for this and update this post if anything changes.
So when it comes to taming the Texas Juniper (Juniperus ashei; AKA ashe juniper, post cedar, mountain cedar, blueberry juniper or *incorrectly* cedar), it’s time to pull out all the stops.
Everybody’s seen them: Those late night ads with WASPey guys in razor creased khakis merrily obliterating all that’s trashy on the “estate.” The Fat Rancher thought: “That’s me!” And when I saw that DR Power had the TRM 875 Pro-XL Trimmer/Mower on sale as “reconditioned,” I had to give it a try. Not only is it a heavy duty string mower, but DR offers the 12″ Beaver Blade and the DuraBlades ™ as options.
The thought pattern was this: Use the DuraBlades to clean up the fence line, use the Beaver Blade to blitz the juniper saplings and small trees. As we’ll see, the reality turned out a little different.
The Equipment
The 8.75 Pro-XL is an electric start 8.75 ft.lbs. string trimmer with optional self-propulsion. Wheels are either
Self-propelled DR Pro-XL Trimmer/Mower.
16″ on the non-propelled version or 14″ on the self propelled. While the wheel size difference escaped me while I was making a purchase decision, in operation it became apparent why the DR Power people downsized the wheel. I’ll elaborate later.
The electric start Briggs and Stratton engine is a Professional Series™ 190cc overhead valve, vertical shaft power plant. In addition to the electric start (Facilitated by a small gel-cell battery located at the back of the engine), it this gasoline engine sports a dual-sealing “commercial-grade” air cleaner, Super Lo-Tone™ muffler.
One of the first things I look for: A Fuel cutoff. If none, I add one myself.
Most importantly, it has a fuel-cutoff valve! As I have mentioned before, ethanol laced gasoline is a hazard to lawn power products. And the only way to assure that you don’t gum up your $1400 piece of equipment while it’s sitting in the barn is to run the fuel out of the carburetor system at shutdown. This inexpensive feature is important (as is fuel additive).
The Business End
The included trimmer head is a nifty arrangement of several string plates that are sandwiched together. The result is a trimmer head that can be filled at various heights above the mower ball.
Installing string is simple as long as you have re-hydrated the mower string. It loops over in a straightforward fashion providing 4 strings on opposing sides for cutting action. Why does the DR string require hydrating? I don’t have the foggiest idea. But apparently hydrating does to facilitate installation and reduce breakage of the line.
DR string head with optional aluminum mower ball.
DR Power Cord Hub
An optional aluminum mower ball is required to be used with the Beaver Blade. But it’s a pretty bulletproof item to have on the end of the drive shaft with all accessories. The included anti-wrap shield above the mower head also serves as a locking ring to facilitate removal of head tools.
The Beaver Blade™ appears to be the love-child of a circular saw blade and a chain saw. The 12″ product sold with the DR TRM 875 has an aluminum hub encircled with your run-of-the-mill chain saw blade. The chain can turn on the hub under strenuous conditions (over heat of the blade or jam with something solid), but that shouldn’t occur under normal use. As mentioned before, DR requires their aluminium mower ball to fasten this blade in place.
Beaver Blade sold through DR Power.
Beaver Blade mounted on the Pro-XL
The last trick up the sleeve of DR Power is the DuraBlade™ kit for DR Trimmer/Mowers. DR claims that the DuraBlade turns the Trimmer/Mower into a light brush and bramble cutter, slicing “…through 3/8” woody
DR’s DuraBlade
DR’s DuraBlade
material and tough weeds with ease!” In fact, these blades are a mini-flail cutter with three swing blades comprised of sheet metal encased in plastic.
In action
Setup
The TRM 875 arrived via UPS in a single box. I must say, the box looked like it had been to Timbuk2 and back with skid marks and loose sides. The mower arrives with wheels remove and the mower supported by two cardboard braces under the axles. While this arrangement should have reduced the chance of damage, in fact, the right axle was slightly bent, apparently from a drop.
UPS had already left and, honestly, I didn’t want to have to mess with a claim or replace the axle myself. So I didn’t bother calling DR and asking for a replacement axle. I merely bent the axle back and mounted the wheels. Two things: First, the packaging apparently couldn’t withstand the freight manhandling. Second, in my opinion, if the axle isn’t strong enough to handle a short drop, then the axle design is too light. I shouldn’t have been able to bend the axle back in place.
Installation of the auxiliary brake (required with Beaver Blade) was straightforward, as was installation of the wheels. In no time I had the string hub installed and oil added to the engine.
Operation
Startup was quick and easy with the blade clutch and propel leaver just as expected. It was time for some string trimming!
As expected, trimming was non-eventful. The heavy gauge string worked well on the wild grasses and what-not around the house.
The self propel feature works as advertised, with speed controlled by the amount of pressure applied to the movement handle. However, what I found was that with any unevenness in the terrain, using the power drive was problematic. First, the wheels are so small that any root or stone brings the mower to a halt. Second, the limited amount of propulsion torque available meant that a running start was necessary to navigate over exposed roots and crevices.
Now I understood why DR made the wheels on the powered model smaller: To deliver more torque to the wheels. However, it’s still not enough. So I found myself rolling forward until it stopped against a root, then pulling it back and taking a flying run to keep going. Sub-optimal all around.
Worse, the free-wheel feature requires that power be removed from the wheel and the unit pushed forward a little to disengage the drive mechanism. Obviously if you have been stopped in place by an obstacle, that’s not possible. So the operator ends up dragging the mower backwards with the drive still engaged (though not powered) to reposition the mower. Tiresome at best.
Memo to DR: This self propel feature will be useless to those who don’t have smooth lawn. Which is probably about 80% of your market. Maybe I’m wrong. Perhaps it’s only in Texas where we have stones, exposed roots and ruts. In retrospect I should have purchased the model with larger wheels and no propulsion.
Next up: The Beaver Blade. I really had a hard time containing my excitement as I installed the Beaver Blade and made my way to the cedar break I was clearing. That is, until I got off the driveway and started trying to push over natural terrain. The Mower/Trimmer just didn’t want to go over the surface roots and rocks, and the power drive didn’t have enough torque to plow through.
Once I finally wrestled the machine to a likely victim (a 6 foot juniper with a two inch trunk) I figured out that unless the trunk was straight up or leaning away, there wasn’t enough blade left outside of the drive unit to go all the way through the trunk. I powered the Pro-XL up and tipped the blade into the trunk and it zipped right through. Success!
I moved to the next tree: It was leaning the wrong way. I tried to reposition to the other side, but low hanging branches prevented “optimum positioning.” Memo to DR: 3 inches of usable blade is not very practical.
Finally, I set up the DuraBlades to work on the fence line. Remember the issues I had with mobility while cutting saplings? Treble that pain with brush involved. It was very difficult get the trimmer head into the positions I needed. And powering down a fence line? No way.
In this ridiculous illustration from DR, you can see that blading into a tree is grossly limited by the small size of the blade. This guy isn’t cutting this tree down with that.
Worse, the DuraBlades would not effectively cut green vines or tree root suckers. What I was left with was skinned and bent branches. I resorted to pruning shears.
It’s pretty cumbersome as a string trimmer, grossly undersized as a tree cutter, and ineffective as a brush flail.
While DR has an aggressive return policy, The Fat Rancher dislikes returning products which have been used hard. So I’ll probably try using it a few more times and then probably sell it on Craigslist.
I also may try to find an 18″ wood cutting blade that will fit on the machine. Then maybe I can do some damage to those pesky junipers.
The Fat Rancher isn’t a big hunter. Well, he is big; just not much of a hunter…
Regardless, one of the first “installations” at The Fat Rancher’s place was a deer blind. Or is it a wildlife observation post? I’ll confess I’m just as happy watching the deer from above as I am shooting at the evil wild pigs.
When I started looking at blinds, I visited our neighborhood feed store Winkley’s here in Liberty Hill. Our buddies there sell the T-Box Deer Blind which is made close by in Waco.
The Fat Rancher chose the 4×8′ blind because, hey, just because your on a Dr. Pepper budget, doesn’t mean you shouldn’t have first class blind accommodations!
The T-Box deer blind is made of 3/4″ foam walls sandwiched with fiberglass. It features a fully gasketed door, aluminium framed sliding glass windows, wall-to-wall carpeting and carpeting on both the storage shelf and the shooting ledge. There are 30″ windows on either end, a 50″ window on the “front” (door) side and three 30″ windows on the back.
T-Box Blind 4×8 interior finish
T-Box Blind 4×8 exterior
While this blind is painted a lovely camo green, calling it “camouflaged” is a little stretch. Yes there were a couple of contrasting stripes painted on the unit we bought. But my daughter and I had fun adding some “camo-graffiti” to the blind after it was installed.
Setting it Up
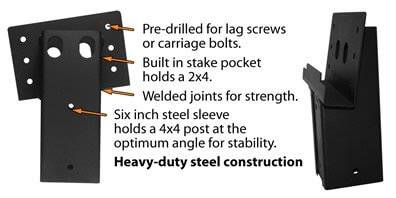
T-Box offers some nice metal stands for their blinds. However, The Fat Rancher likes to think of himself as self-reliant (and a bit cheap) and decided to make his own platform. This was accomplished with a wood frame and Elevators brand brackets to mount the 4×4 legs.
Elevators brand 4×4 compound brackets make attaching legs straightforward.
Construction of the deer blind stand
The 6’x8′ platform was constructed from 2×6 frame reinforced with two lateral studs installed crosswise at 2′ and 4′.
Since the blind is 4’x8′, this gives me 2′ of landing at the door. A very handy area to place equipment on from the top of the ladder and facilitate maneuvering into the door. Not coincidentally, this also provided a 2×6 under each wall of the blind to support the deer blind weight.
On top of this frame I added some treated 1/2″ plywood for decking (in retrospect, I should have used 3/4″). This was all painted with camo-green house paint. Joints were reinforced with aluminum framing brackets, and treated decking screws were used throughout.
Installation of the T-Box Deer Blind
Lifting the blind with the tractor fork
I used the Kubota tractor with my trusty 7-Spear Ultra Fork from USA Forks to raise the blind onto the platform (CAUTION: Lifting items with your tractor is DANGEROUS! Insure you have adequate counterbalance for the load you lift!). Once the blind was in place I used 6 FastenMaster HeadLOK screws to fasten the blind to the wooden support. These screws are ideal as they are treated, have long shanks, are made of quality metal (so the heads don’t twist off) and use a special drive which eliminates cam-out.
After securing the blind to the stand, we gave the rest of the stand a coat of that lovely Camo Green paint and customized the blind further with some other camo colors from Rust-Oleum (what is an oleum, anyway??).
Access to the blind is accomplished with a 10 foot fiberglass folding ladder. I considered using additional Elevators brand single angle brackets to build a permanent ladder to the blind.
However, I decided that since the folding ladder spent most of its time in the barn, it was more utilitarian to use it for access:
Fiberglass lives just fine out in the elements
The extra two feet of ladder that extend above the platform makes a handy “handle” for mount-dismount from the ladder
I can remove the ladder to discourage unauthorized users from climbing the platform
We finished the installation with a battery powered LED motion light similar to those found HERE. That way the lights come on when we enter and then we turn it off while we sit.
Installed T-Box deer blind. This ladder is a 6′ ladder. I use the 10′ to get on/off the rear deck.
My Take
The T-Box Deer Blind is sturdy and pretty well constructed. The fit and finish are adequate and relatively tight. In fact, I have found very few insects inside the blind which seems to confirm the seal quality.
Likes
Solid construction
Door seals well
No moisture ingress issues
Carpet on interior surfaces reduces noise
High ceiling makes it easy to move around inside
Little fiberglass smell
Dislikes
In a few spots (inside) the fiberglass was not fully laminated down. These were not structural issues, but rather cosmetic in nature. If you have worked with fiberglass, you know that this leaves “spikes” which are annoying (clothing snags) to painful (if you manage to spear yourself). I would check the interior of the unit you buy and choose one with minimal defects of this sort.
The three windows on the long side means invariably you will have a “pillar” where you want to position. T-Box would have done better with two larger windows on the long side.
Windows are not removable. It would be nice if you could “raise up and tilt out” the sliding panes to give more open area in a window. As it stands now, you only have 1/2 a window open once you slide one of the panes open.
Latches: It would be nice if the windows included some plastic clips to secure the windows closed. If you install the blind at ground level, you will find that your cattle may nuzzle the windows open while looking at their reflections. Then, of course, you get insects setting up home.
Conclusion
Going on two years, the T-Box deer blind has met the challenge of drought and drench. My daughter and I really enjoy sitting in the blind and watching the progression of turkeys, pigs and finally deer as they wander through the back pasture. Sometimes we even take the thermal scope out and try to call coyotes after it turns dark. The 4×8 size is just right for two people, with enough room to maneuver around.
The Texas A&M Beef Cattle Short Course has a rich tradition and historical place in the programs emanating from the Department of Animal Science at Texas A&M University.
Dating as far back as 1942, Professor John K Riggs started the first in a series of Beef Cattle Short Courses held on the campus of Texas A&M College. The goal was to discuss the results of beef cattle research from the Texas Agricultural Experiment Station with Texas beef producers. This historical beginning and purpose is still the standard today for the Beef Cattle Short Course held at Texas A&M University.
Today the highly respected TAM Beef Cattle Short Course is nationally and internationally recognized as the largest attended beef cattle educational program of its type in the world. It has gained the respect from organizations, associations, Land Grant universities and agencies alike as the focal point for beef cattle educational information.
August 6-8, 2018 at Texas A&M University >>Register Here<<
The Cattleman’s College features more than 20 concurrent sessions. Topics include animal health, nutrition, reproduction, breeding, genetics, selection, research, marketing and handling. Management sessions will cover business, forage, range, and purebred cattle. Topics such as landowner issues and fence building will be featured at this BCSC. Sessions are designed for everyone, from the newest member of the industry to the most seasoned producer.
Additionally, over 150 agriculture related businesses and trade show exhibitors annually attend the course. They attest to the fact that it is the most highly attended activity of its kind anywhere in the United States. Annually over 1,700 participants attend the Beef Cattle Short Course to gain valuable knowledge about beef cattle production.
The Fat Rancher thinks that the Texas A&M BCSC is truly a great opportunity to bootstrap your knowledge or learn advanced techniques. It’s well worth the time and money.
While The Fat Rancher likes that colder weather so he can burn up some of the accumulated firewood, Spring is fun to watch come about. The Spring wildlife have emerged to prepare for the summer.
Cedar Wax Wings have joined the American Robins before their trek to wherever robins spend their summers.
The Rio Grande Turkeys are strutting their stuff about the ranch, and Thanksgiving is nowhere in site!
New drifts of pigs have appeared. They apparently don’t know that The Fat Rancher is Yosemite Sam incarnate… And the neighborhood hawk is looking for a tasty Meadow Vole.
The whitetail bucks are back in herds. They’ll lose their antlers soon, and TFR will be out looking for those 8-pointers I’ve been watching all winter.
Even the Redbud is happy…
…and the songbirds too. They especially like our new wildlife guzzler which insures that a drink of water is handy.
Does enjoy a drink from the new wildlife guzzler
>>Thanks to my lovely wife for taking many of these great photos.<<
If you have any acreage at all, your going to be busy cleaning up fence lines, felled trees and maybe even moving firewood. A utility trailer is a must.
After the purchase of my Mule, the next buy was a trailer for hauling around the property.
I looked at several products, but I wanted one that wasn’t going to fall apart in a year or two, and something that could take a few knocks. I settled on the Polar Tandem Axle HD 1500TA Utility Trailer from Amazon ($759.99).
Polar Tandem Axlle HD 1500TA Utility Trailer
Polar Utility Trailer in Action
This product is unique in that it has a high strength poly tub (bed), a wide wheel base and a tilt feature which makes single-man use simpler. It comes standard with a pin hitch which works fine with a lightweight trailer hitch tongue. Dimensions are 72in L x 40in W x 18in H, and capacity is 22 Cu. Ft. and 1500 lbs.
Assembly of the Polar Utility Trailer is straightforward: Everything comes packed in the tub. The frame must be bolted together and wheel/axle assembly completed. Then the tub is attached to the frame, and the side rails to the tub.
There were no issues completing the work. The only issue I had was that the circlips holding the wheel bearings in place weren’t fully seated.
Polar Trailer Side Rails
In all, this trailer has been a great help in moving juniper cuttings to the burn pile, split logs to the house, and tools along the fence line.
The only quibbles I have with the product are that the tilt release latch seems a bit flimsy (though I have had no issues yet). Also, the tow point on the trailer is far enough aft that when you tilt the tub to dump and pull the trailer forward to empty it, it has a tendency for the dual axles to skew (jacknife). Once it’s empty, its easy enough to rotate back and latch. It’s just a little annoying.
The Polar Dual Axle Utility trailer is not cheap. But it looks like it will last a while around the ranch and has been very handy so far.
As we pulled our travel trailer back to Liberty Hill, I reflected upon what I got out of the two and a half days I spent at the Rudder complex at TAMU.
I have to say, if you told me four years ago that I would spend several days with people darn near obsessed with cows, I would have laughed. Yet, there we were. A few of us city folk and newbies among throngs of ranchers: Young and old, black, brown and white, from big to small cattle operations. What were we doing? Listening to experts discuss genetic traits, forage growth tactics, ultrasound diagnostics. Learning about data management, testicle circumference, in-vitro and artificial insemination, fence building, equipment, business and marketing.
Attendees at the fence clinic learn installation technique.
Around 1400 attendees descend upon Texas A&M for each BCSC. One thing that became obvious early on was the love these people had for their land, animals, nature and freedom. I struck up conversation with several folks to hear about their businesses and avocations. The one thing they all had in common was their love of their rural lifestyle.
There were full-time pros among the attendees. But I got the idea that many ranchers had “day jobs” that provided them with the financial security to invest in their land and operations. A buddy of mine once told me: If I had five million dollars, I would ranch until it was all gone! For some that might be true.
What You’ll See
Truly, the event was well worth the $180 registration. My thanks go out to TAMU Agrilife Extension along with the many sponsors and exhibitors which make this event affordable and informative.
For the land manager interested in raising beef cattle for consumption, profit or show, this two and a half day event in College Station is well worth the effort. I’m still digesting what I learned and formulating a business plan with what I learned. I’ll share more here at my thoughts progress.
Happy August! And may you be blessed with reasonable amounts of rainfall and a cool respite once in a while.
But he does believe in saving wear and tear on his truck and knees. So finding a solution to open the gate at “el rancho” from inside the truck was a challenge in search of a hack.
Now, if The Fat Rancher had a fancy gate, he might be inclined to purchase a solar powered gate opener. But, TFR has seen more of these openers hanging in the breeze (inoperative) than opening gates. Spend several hundred dollars on something that is prone to break? Nope.
So he needed a solution that was cheap to replace when it crapped out. Then it hit him: All he needed was a remote lock and a spring to pull the gate open. While not a complete solution, it reduces the jumps from the truck by 1/2. That’s a start!
How to do it
Using the Mighty Mule FM245 with a hand fashioned hasp attached to a galvanized gate.
What I ended up using was a Mighty Mule FM245 Cable Gate Lock (available at Home Depot for $45) with a hand fashioned hasp attached to the galvanized gate. In order to align the gate with the post, the end of the 2″ x 5″ zinc plated U-Bolt ($2.48 from Lowes) will need to be bent 15 degrees about an inch and a half from the end. Then mount it in place with backing nuts and split washers. Hint: If wind blows the gate closed from an open position, sheet metal where the bolts go through the gate may rip due the force of the hasp slamming against the lock. Reinforce this attaching point by using two of the back plates that accompany the U-Bolt, one on either side of the sheet metal gate.
5″ x 2″ U-Bolt (Courtesy Lowes)
Now, the next tricky part was arranging a spring to retract the gate when the gate lock is released.
I looked at a pulley and spring arrangement, but the combination of required torque and the stroke distance (17′ on a 12′ gate. Pythagoras’ theorem, than you very much!) made this unworkable.
The solution? A spring reel seemed right. So off to the hardware store we went in search of an affordable reel. As it happens, Amazon had a Bayco retractable extension cord on sale (Bayco Retractable Cord Reel with Three Outlets, $43).
This was disassembled (CAUTION: Dangerous Spring!) and the extension cord was replaced with braided nylon cord. A rewind of the cord into the housing and voila! Cord retractor!
The reel was mounted to the post behind the gate hinges and the retractor cord was routed through a pulley affixed to the gate stop and then tied to the gate next to the hasp.
So the Mighty Mule lock releases the gate, where the cord retractor is tensioning the gate hasp against the lock. The cord retracts pulling the gate to the stop by the side of the road. Closing the gate by hand extends the cord, rewinding the opening spring.
Now, I have to tell you that The Fat Rancher’s wife was incredulous when she first saw the “Redneck Gate Opener.” But two years later it has save her many a trip out of the car in rain and Texas heat. She’s a believer now.
Me? I still want a fancy iron gate with open/close action. But I have to admit, watching the gate spring open against the gate stop still puts a smile on my face. And when I accompany the
Extension cord retractor “repurposed” as a cord retractor for the gate.
opening action with a happy verbalization of “Sproooiiiinnnnng!” my thirteen year old grins at the nutty old man. That’s something I wouldn’t get with a real gate opener!
You are trundling to and fro on the back 20 and you notice your three-point needs adjustment. Where are your tools?
It’s often I am out on the property that I find myself looking for something: Tool, sunscreen, phone battery booster, snake greeter…
Now, The Fat Rancher likes to think of himself as open to progressive ideas. But he does draw the line at the man-purse. And while there are no spots to mount a tool box on my Kubota, I have a need to tote.
Making a Tractor Tool Caddy
The solution? A manly tool pouch affixed to the tractor seat. What I have here is a Husky Tool Wall from Home Depot, hanging from the tractor seat with a Husky 2 Inch Tool Belt . I also added an aluminium carabiner to hang my tea-thermos from.
Redneck Tractor Tool Caddy
This particular tool pouch is made to hang on a peg board. If I were to do it again, I would use pouch designed to hang directly off a belt. Sadly, Home Depot didn’t have one of these with the pocket configuration I wanted. So I had to attach the pouch to the belt with zip-ties.
Still, it makes a handy storage system for those “sundries” that are helpful out in the field.


 Even the Redbud is happy…


